 |
| |
|
|
|
 |
|
Starting
Out. |
|
|
First, this is really easy, whenever
I teach folks they go "That's it? That's easy!". It
really is simple, you won't believe it. My students
come back going! "WOW! everyone thinks I'm like a god
now!" Really. Once you do it a few times, your' hooked.
It progresses faster than regular embroidery.
Yes, as far as my embroidery goes,
everything is couched within an inch of it's life. No
escape, no surrender.
Period method
was to string all the beads on at once and then one
by one couch them in place with a second thread. It's
hard cumbersome and not durable, if a thread broke you
could loose whole lines.
I have developed a method that
is in looks Identical to period couching but is... gasp...
machine washable and sturdy as a elephant and even can
be worn in yes... battle.
- First USE good heavy cloth, broad
cloth weight weave will pull apart and believe it
or not, the weave will form holes and beads will flip
around to the backside if you aren't careful. I've
done this, trust me, use cloth up to the task.
- I recommend
you do pieces Oxford, light canvas, or even trigger
type materials. They have a dense heavy weave. Basically
if you can read a license plate through it it's too
light. If you are doing accent pieces for light garb
recommend you appliqué it on, hey it's period!
And if the garment wears out, you simply remove it
and apply to something else.
- If you want fabric showing around
and IN your design but one that isn't capable of handling
it, or want added protection, BACK the material with
trigger or somesuch. More is never a bad thing.
|
|
 |
|
DRAWING IT OUT
Using PENCIL like I said before, I use a mechanical
pencil (just easier since it doesn't have to be sharpened
and fits in the bead kit better)
I draw cross hairs more often than not
so I can periodically check the way the material is
shifting. You can use a magazine, postcard any thing
SQUARE for this check.
You will from time to time have to redraw
areas, don't fret it's normal. Especially in freestanding
shapes like this. IF you DON'T do it everyone will know
as it will be lopsided and uneven. Get used to the idea
you WILL be doing touch ups to the design.
I hand draw, but you could use carbon
paper, there is a line at art supply houses for fabric
that washed out.
Or you can hold the fabric to the window
and have a black line drawing behind it against the
cloth and trace the image on the front, this works really
well if you don't have a lightbox. This is how I do
designs sometimes.
|
| |
|
|
 |
|
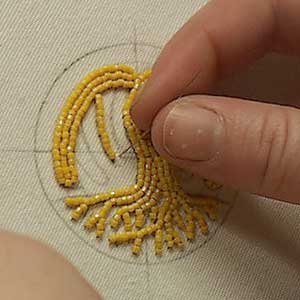
(I didn't start shooting pictures of the
procedure until I was started, but that's OK, just pick
up from here. Sometime in the future I'll re-shoot this)
STEP ONE
Come up next to your line with your needle.
OK one thing to
remember is your guidelines.
Which ever way
you will be running your beads, the sticking to the
guidelines is the most important part, you may need
to back off the line a bit so the edges fall directly
on it.
|
| |
 |
|
STEP ONE
Load your needle with some beads.
Gather the beads at the end of the thread
with your needle and find out where your thread needs
to go next.
Go down right next to the end bead, don't
leave too much or not enough room, the beads should
lie flat and not have a sag or open gaps.
In
small tight areas you may only want a few, in longer
straight areas you could well do over 20 or 30.
I
usually tech folks with 4 beads at a time at first,
it can be hard to scoop them from t he bowl until you
learn how to hold the needle and 4 is easy to do without
trying.
|
| |
|
|
 |
|
STEP TWO
Come up from underneath and come up in the middle of
your line you just put down, at a crack between beads
so you will not cause gaps.
You can use the
stitch coming up between your lines to shape the row
into curves, it will naturally lay flat, but come up
a bit to one side and come through the rest of the line
and it will curve. This is how you shape the lines.
|
| |
 |
|
STEP
THREE
Pass your needle through the
beads starting from where you came up.
|
| |
 |
|
STEP FOUR
Load your needle again.
|
| |
|
|
 |
|
And continue, repeating the steps
so far as you need.
When you need to lay another row,
give room for the beads, don't come up RIGHT next
to the edge. Roughly give a 16th of an inch, or less.
You'll get how to work the spacing after awhile.
|
|
| |
|
|
